98 Vinyl Sticker Application Instructions
Clean the area thoroughly with rubbing alcohol or soap and water. Saved by Sherry McConnell.

Tagzs I M The Black Jeep Of The Family Diecut Vinyl Window Decal Sticker Car Truck Suv Jdm
Decal application instructions.
Vinyl sticker application instructions. Once the vinyl touches the surface there is no removal without damage. The Wet Install is. Discard the backing sheet.
Be sure the entire sticker is attached to the opaque transfer sheet. So cut all the vinyl for your decals at once. Holding the decal by the left and right sides and keeping the decal flat place the decal against the surface.
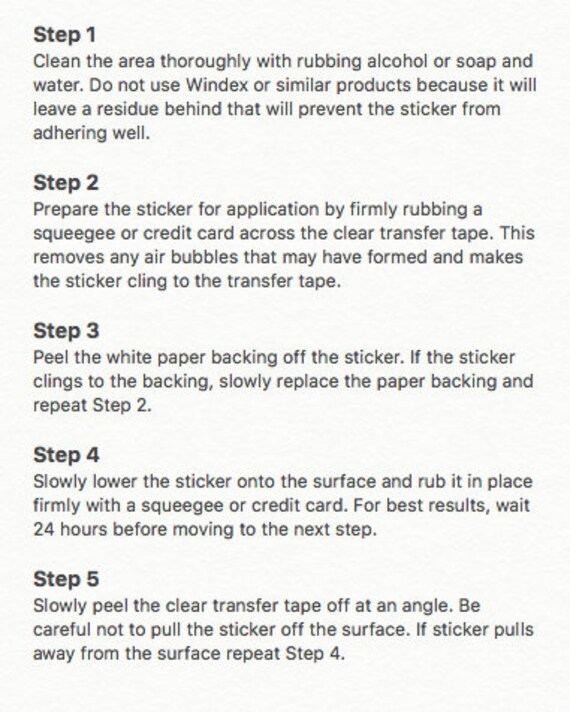
Clean the destination surface and dry it thoroughly. Peel away the vinyl liner at a 45-degree angle. Step 1 Clean the application area with alcohol or soap water.
When I say batch create what I mean is to do everything in stages. Then take a heat gun or hairdryer and warm the surface and even some light heat on the sticker cant hurt dont put too much it can damage it. Then apply the transfer tape to everything.
Apply to a smooth surface such as a window. Peel of the white backing paper. Lift up the other side of the vinyl decal using the tape as a hinge.
Step 2 Using a squeegee or credit card press firmly on the decal to ensure that the decal sticks to the application transfer paper. This will be a huge time saver for you. Use creditID card to help smooth down the decal to the surface.
DO NOT remove any of the layers yet. You will save time and time is money. Position your sticker in place using the masking tape leaving one end free.
Finally package them all. Place the decal on the car ensuring no part of the decal touches a try spot. Vinyl Sticker Application Instructions FOR BEST RESULTS.
If the vinyl does not separate from the liner simply burnish the Transfer Tape onto the vinyl and peel away again. Spray the back of the vinyl as you peel it back. Peel the backing from the decal exposing the adhesive.
The temperature should be approx 65-75 degrees 1. Do not use an alcohol or ammonia based product as it will compromise the adhesive. Please allow a newly painted surface a month to fully cure before application it remains.
Vinyl Decal Application Instructions Created Date. Step 3 Peel the paper backing away from the decal very slowly. Use a craft stick or a Cricut Scraper to burnish rub or polish the tape onto the vinyl.
The water will keep the decal from sticking right away. Peel back the application tape gently making sure the sticker is stuck on it. Thoroughly clean the surface.
Then weed all the designs. Maneuver the decal into. Step 2 Rub a squeegee or credit card firmly across the sticker through the clear transfer tape to prepare it for application.
Roll the vinyl silhouette back onto the surface. This will be so much quicker than doing each decal one by one. Peel off the clear transfer tape.
Do this a few times to tack up the surface plus it removes small pieces of dust and imperfections. To give you time to get the placement right. Applying vinyl with a light mist of application fluid solution on the surface allows for re-positioning and reduces the chance of bubbles and wrinkles.
Custom Decals Vinyl Decals Car Decals Vinyl Quotes Cricut Tutorials Cricut Ideas Cricut Vinyl Cricut Craft Used Vinyl. When you receive your sticker it will be sandwiched between a backing sheet and application tape. Rub it down with your hand.
Do not use a glass cleaner because it will leave a residue behind that will prevent the sticker from adhering well. The dry install does not allow for any mistakes. Spray car generously with the application spray provided or use a mixture of soapy water in a spray bottle.
It is that easy. Apply masking tape on the area then remove.
